Wednesday, May 26, 2010

BEST SHOTS when you are in control ( MANUAL MODE)


Taking your camera off "auto pilot" and doing some of the legwork can be a bit intimidating at first. Like I said before, a good digital photography book will explain all that you need to know if you're a little unsure of yourself. Or just simply experiment with your camera-it is digital-there's no film processing costs! Aperture, shutter, focus-these aren't nearly as hard to learn to adjust manually as it may seem, I promise! After all, I managed to teach myself these concepts, and have gone on to become a serious amateur photographer, even getting paid for some of my work!
The short answer, & especially in tough conditions, first set the f-stop & shutter speed you need. Then adjust the ISO.

Shooting in Manual. I mentioned that there may be 6 or more combinations of Aperture and Shutter Speed that give us a good exposure. In auto, the camera arbitrarily selects one of these combinations and that's what you get. This is why we want to shoot in manual. You know what you're trying to achieve when you depress the shutter, the camera does not. Ok. Ready. Turn that dial to M. Check your ISO. Change it if you need to. Bring the viewfinder up to your eye. Still looks the same right. Except for the meter. What is the meter telling you? Underexposed? Try a lower f/stop to let in more light or a slower speed to give the light more time to get in. This is where you start learning to shoot in manual. Remember that there are a few different combinations of settings that will turn out a good exposure. Try a few. See how different f/stops affect the photo. You may notice the meter change as you zoom in or out. Most consumer level lenses have a range for the largest aperture (small number) that changes with the focal length. You can look this up on your own. Just know that zooming in my change your exposure and require you to make an adjustment. Some cameras may have only one adjustment dial and require you to depress a button while turning that dial to adjust one of the settings. It will take a little time and you will forget some things at first. Stick with it. You will see a difference in your photos in the end.

Tuesday, May 25, 2010

MY baby is 20 months

My sweet little man is growing so fast, it is super hard to capture him. I was ready this time with my 85mm lens.

Sunday, May 23, 2010

Macro! What is MACRO Photography?


I have always wanted to try my hand at “Macro Photography” - Let me tell you, not only is it interesting, but it keeps you thinking and most of all it can become an addiction. The reason being that the more detail you get into it, you end up buying a lot of new equipment.

So what is this Macro Photography after all? To cut a long story short, it is a method of getting close up pictures of a subject. It helps you take close up pictures of small things.
Many say it is
“AN ART OF TAKING CLOSE UP PICTURES THAT REVEAL DETAILS WHICH CAN’T BE SEEN WITH NAKED EYE”
It is a term applied to most close up photos but should actually only be applied to photos which have a 1:1 or closer magnification.
Macro is a fascinating field in photography as you can take macro shots where ever you are. From finding small details of larger objects to creating abstract looking images; from taking pictures of creepy creatures like spiders and beetles (my favorite subject) to taking close ups of flowers, you can do it all.

I would like to share some of the inputs and knowledge that I have picked up through my experiments with Marco Photography. Here are few points I have put together, which might help you in getting up close with “Macro Photography Tips and Techniques”
*** If you do not have a MACRO lens, I have a converter macro attachment to test the waters out.
1) Switch on Macro Mode:
This could be simple, but again could be a little confusing for the average beginner. This setting allows you to bring the camera lens closer the subject. Generally it is represented by a small flower on the settings dial of the camera; it could depend on the lens as well.
3) Use Flash:
I would NOT recommend using flash. However it is essential as shadows are a macro photographer’s enemy. Choose a location where there is bright light available and don’t forget to carry some form of a reflector to fill the shadow. It could be a proper reflector from a photo shop or a white back cover.It would be an advantage if your camera gave you control over the flash, if it doesn’t use a piece of tracing paper and drape it over the flash to diffuse the strong flash light.

4) Manual Focusing:
I would recommend setting the focus to manual and focus on the part of the subject you want in sharp focus. The ability to focus manually is a big bonus, however allowing the camera to choose by auto focusing will interfere with where you want to focus.

5) Aperture:
Ability to set aperture is a big advantage as this allows you to control the depth of focus mentioned in point four. It determines how much of your image is in focus in front of the subject. I believe some cameras won’t allow changing the aperture once the setting has been changed to macro mode. If you can change the aperture you’ll probably use a large aperture in order to blur out the background which is very effective for close ups.
6) Composition:
I feel this is one area where you’ve got to pay a lot of attention. Placing your subject and making it the focal point are essential to good macro photos. Do not be so focused on the detail you could end up with a situation where the composition goes out of the window.

7) Self Timer:
Yes! You heard me right; a self timer plays an important role in limiting camera shake and vibration when pressing the shutter button.

Thursday, May 20, 2010

ISO vs. APETURE

I am getting alot of request to post more information about ISO and Apeture:

ISO determines how sensitive your sensor is to the light. The higher the ISO value, the more light your camera can record. The downside is that the higher the ISO value the more noise you will see in the image. Noise is the grainy, gritty like effect you will sometimes see in your images. I always try to shoot at the lowest ISO value that I can.
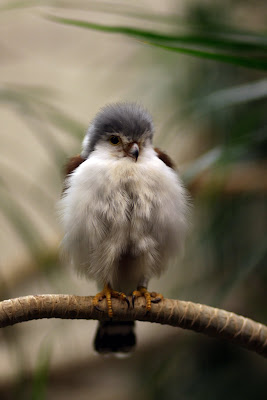
(This picture was shot with an 85mm at f/1.8) You can see how ALL of the focus is on the bird and the background is completely blurried out.


Your apeture setting is what can create a soft, blurry, out of focus background. The apeture is the opening inside your lens that lets the light pass through it an onto the sensor. The effect is called Depth of Field (DOF). This is the area in front of, and behind your focal point that is acceptably sharp. The bigger the opening - such as f/1.8, the shallower the depth of field. With a shallow depth of field you will get that blurry background. Great for portraits, and shots that you really want to isolate one subject and make it stand out. The smaller the opening - such as f/16, the deeper the DOF, meaning much more of the stuff in the image will be in focus. This is ideal for lanscape shots, when you want to be able to see everything nice and sharp.

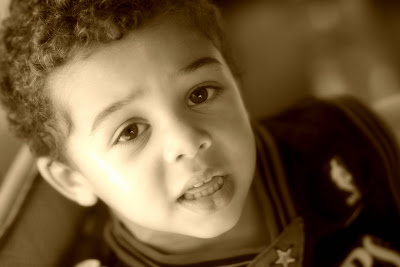
(This picture was taken with an 85mm at f/2.20) You see the background is slightly blurry and all the focus is on handsome LJ.

Bryan Peterson has a book called Understaning Exposure This book does an amazing job explaining this.

Tuesday, May 18, 2010

BLOG CONTEST WINNER!

This is MAMARATZY'S first BLOG contest winner. CONGRATS and enjoy your prize Lindsey Bledsoe

I've attached my current favorite picture from my recent work. I love the color and spontaneity in this picture, she's such a ham and so extremely sarcastic, and it just makes me laugh every time I see it. It's so her, and I love how it captures and reminds me of the pure joy of just sitting in the rain. It's also a reminder for me that even mismatched clothes, photos taken above f/1.8, and photos that aren't deep dramatic black and white can be just as meaningful.

Saturday, May 15, 2010

Prom photo shoot.

This was my first PROM shoot.. This was SO FUN! I highly recommend doing one.

Here are a few pictures:


Wednesday, May 12, 2010

Lets take SHARP and CLEAN images!

Hold Your Camera Well
A lot of blur in the photos that I see is a direct result of camera shake (the movement of your camera for that split second when your shutter is open). While the best way to tackle camera shake is to use a Tripod (see below) there are many times when using one is impractical and you’ll need to shoot while holding your camera.

Tripods
I’m a big fan of them as a way to reduce (and even eliminate) camera shake. While not always practical, the result you’ll get when you do go to the effort of hauling one around can be well worth it.
Shutter Speed
Perhaps one of the first things to think about in your quest for sharp images is the shutter speed that you select. Obviously – the faster your shutter speed the less impact camera shake will have and the more you’ll freeze any movement in your shots. As a result you reduce the likelihood of two of the main types of blur in one go (subject movement and camera movement). Remember the ‘rule’ for handheld shutter speeds:

Choose a shutter speed with a denominator that is larger than the focal length of the lens.

So:

if you have a lens that is 50mm in length don’t shoot any slower than 1/60th of a second
if you have a lens with a 100mm focal length shoot at 1/125th of a second or faster
if you are shooting with a lens of 200mm shoot at 1/250th of a second or faster
Keep in mind that the faster your shutter speed is the larger you’ll need to make your Aperture to compensate – this will mean you have a smaller depth of field which makes focussing more of a challenge.

Aperture
Aperture impacts the depth of field (the zone that is in focus) in your images. Decreasing your aperture (increasing the number – say up to f/20) will increase the depth of field meaning that the zone that is in focus will include both close and distant objects. Do the opposite (for example moving to f/4) and the foreground and background of your images will be more out of focus and you’ll need to be more exact with what you focus your camera upon. Keep in mind that the smaller your aperture the longer your shutter speed will need to be – which of course makes moving subjects more difficult to keep sharp.

ISO
The third element of the exposure triangle is ISO which has a direct impact upon the noisiness of your shots. Choose a larger ISO and you’ll be able to use faster shutter speed and smaller aperture (which as we’ve seen help with sharpness) but you’ll suffer by increasing the noise of your shots. Depending upon your camera (and how large you want to enlarge your images) you can probably get away with using ISO of up to 400 (or even 800 on some cameras) without too much noise but for pin sharp images keep it as low as possible).
Image Stabilisation
Many cameras and lenses are now being released with different forms of image stabilisation (IS) which won’t eliminate camera shake – but can definitely help reduce its impact. I find that using IS lenses that it will give me an extra two or three stops (ie I can use slower shutter speeds but 2-3 stops) when hand holding my camera. Keep in mind that IS helps with camera movement but not subject movement as it allows you to use slower shutter speeds (not good for moving subject
Focus
Perhaps the most obvious technique to work on when aiming for sharp lenses is focussing. Most of us use ‘Auto Focussing’ with our cameras but don’t assume that the camera will always get it right. Always visually check what part of the image is in focus before hitting the shutter and if it’s not right try again or switch to manual focus mode. This is particularly important if you’re shooting with a large aperture (small depth of field) where even being slightly out can result in your subject being noticeably out of focus.

Good lenses
This one is for DSLR owners – if you have the budget for it invest in good quality lenses as they can have a major impact upon the sharpness of your images. For example shortly after buying my DSLR I was in the market for a everyday zoom lens that would give me the ability to have a telephoto zoom capabilities. I bought a Canon 75-300mm lens (which is best for outdoors). It was a good lens (and reasonably priced) but it wasn’t as sharp as some of my other lenses. A few months later I bought a Canon 50mm and a 85mm and was amazed by the difference in sharpness between the lenses. While the first lens was good for what I paid for it.
Hope these little tips help! Enjoy your camera!

Low light shooting and fast lenses!

LOW LIGHT=FAST LENSES!!!
FAST LENS is a must

1. Crank ISO as high as it will go
2. Shoot RAW if possible
3. Use aperature-priority with the lowest f-stop on the fastest lens I have (f1.8 or lower if you can).
4. If that still caases my shutter speeds to be too low to hand-hold, then I might even set exposure compoensation down a stop, which will increase the speed a little, and then I’ll push the exposure in post (preferablly in RAW).
5. Lastly, I’ll use various forms of noise reduction to help on the grain/noise front.

And although a fast lens can be very expensive, there are affordable primes out there, like the Canon f1.8 50mm which is $80, or the f1.8 85mm canon USM that is just over $300. That extra stop or two can seriously make the difference in low light / no flash photography.

EXPLORE WITH YOUR CAMERA


Keep your camera with you all the time.
Photo ops often come when you least expect it. If you can keep your equipment relatively simple – just a small camera bag and a tripod – you might be able to take advantage of some of those unexpected opportunities. Or, if your phone has a camera, use it to take “notes” on scenes you’d like to return to with your regular camera.

Make a list of shots you’d like to get.
For those times you can’t carry your camera around, keep a small notebook to jot down places you’d like to come back and photograph. Make sure to note any important details, like the lighting, so you can come back at the same time of day or when the weather’s right. If you don’t want to carry a notebook, send yourself an email using your cell phone with Jott.com.

Don’t overlook mundane subjects for photography.
You might not see anything interesting to photograph in your living room or your backyard, but try looking at familiar surroundings with fresh eyes. You might catch an interesting trick of the light or find some unexpected wildflowers in your yard. Often a simple subject makes the best shot.


Enjoy the learning process.
The best part of having a hobby like photography is never running out of things to learn. Inspiration is all around you. Look at everything with the eyes of a photographer and you’ll see opportunities you never noticed before.


Experiment with your camera’s settings.
Your DSLR is very powerful and has lots of functions, your point and shoot may be more flexible and powerful than you know. Read the manual for help deciphering all those little symbols. As you explore, try shooting your subjects with multiple settings to learn what effects you like.

Take photos regularly.
Try to photograph something every day. If you can’t do that, make sure you take time to practice regularly, so you don’t forget what you’ve learned.

Don’t be afraid to experiment.
If you’re using a digital camera, the cost of errors is free. Go crazy – you might end up with something you like. You’ll certainly learn a lot in the process.

Knowing your functions.


Portrait Mode
When you switch to portrait mode your camera will automatically select a large aperture (small number) which helps to keep your background out of focus (ie it sets a narrow depth of field – ensuring your subject is the only thing in focus and is therefore the centre of attention in the shot). Portrait mode works best when you’re photographing a single subject so get in close enough to your subject (either by zooming in or walking closer) so that your photographing the head and shoulders of them). Also if you’re shooting into the sun you might want to trigger your flash to add a little light onto their face.
Macro Mode
Macro mode lets you move in closer into your subject to take a close up picture. It’s great for shooting flowers, insects or other small objects. Different digital cameras will have macro modes with different capabilities including different focussing distances (usually between 2-10cm for point and shoot cameras). When you use macro mode you’ll notice that focussing is more difficult as at short distances the depth of field is very narrow (just millimeters at times). Keep your camera and the object you’re photographing parallel if possible or you’ll find a lot of it will be out of focus. You’ll probably also find that you won’t want to use your camera’s built in flash when photographing close up objects or they’ll be burnt out. Lastly – a tripod is invaluable in macro shots as the depth of field is so small that even moving towards or away from your subject slightly can make your subject out of focus. (I’ll write a full tutorial on Macro Photography in the coming weeks).
This is the pollen from inside the flower above ( Maco photography is very detailed)


Landscape Mode
This mode is almost the exact opposite of portrait mode in that it sets the camera up with a small aperture (large number) to make sure as much of the scene you’re photographing will be in focus as possible (ie it give you a large depth of field). It’s therefore ideal for capturing shots of wide scenes, particularly those with points of interest at different distances from the camera. At times your camera might also select a slower shutter speed in this mode (to compensate for the small aperture) so you might want to consider a tripod or other method of ensuring your camera is still.

Sports Mode
Photographing moving objects is what sports mode (also called ‘action mode’ in some cameras) is designed for. It is ideal for photographing any moving objects including people playing sports, pets, cars, wildlife etc. Sports mode attempts to freeze the action by increasing the shutter speed. When photographing fast moving subjects you can also increase your chances of capturing them with panning of your camera along with the subject and/or by attempting to pre focus your camera on a spot where the subject will be when you want to photograph it (this takes practice).

Night Mode
This is a really fun mode to play around with and can create some wonderfully colorful and interesting shots. Night mode (a technique also called ’slow shutter sync’) is for shooting in low light situations and sets your camera to use a longer shutter speed to help capture details of the background but it also fires off a flash to illuminate the foreground (and subject). If you use this mode for a ’serious’ or well balanced shot you should use a tripod or your background will be blurred – however it’s also fun to take shots with this handheld to purposely blur your backgrounds – especially when there is a situation with lights behind your subject as it can give a fun and experimental look (great for parties and dance floors with colored lights).

Movie Mode
This mode extends your digital camera from just capturing still images to capturing moving ones. Most new digital cameras these days come with a movie mode that records both video but also sound. The quality is generally not up to video camera standards but it’s a handy mode to have when you come across that perfect subject that just can’t be captured with a still image. Keep in mind that moving images take up significantly more space on your memory storage than still images.

Other less common modes that I’ve seen on digital cameras over the past year include:

Panoramic/Stitch Mode – for taking shots of a panoramic scene to be joined together later as one image.
Snow Mode – to help with tricky bright lighting at the snow
Fireworks Mode - for shooting firework displays
Kids and Pets Mode – fast moving objects can be tricky – this mode seems to speed up shutter speed and help reduce shutter lag with some pre focussing
Underwater Mode – underwater photography has it’s own unique set of exposure requirements
Beach Mode – another bright scene mode
Indoor Mode – helps with setting shutter speed and white balance
Foliage Mode - boosts saturation to give nice bold colors


Semi Automatic Modes
Aperture Priority Mode (A or AV)
This mode is really a semi-automatic (or semi-manual) mode where you choose the aperture and where your camera chooses the other settings (shutter speed, white balance, ISO etc) so as to ensure you have a well balanced exposure. Aperture priority mode is useful when you’re looking to control the depth of field in a shot (usually a stationary object where you don’t need to control shutter speed). Choosing a larger number aperture means the aperture (or the opening in your camera when shooting) is smaller and lets less light in. This means you’ll have a larger depth of field (more of the scene will be in focus) but that your camera will choose a slower shutter speed. Small numbers means the opposite (ie your aperture is large, depth of field will be small and your camera will probably choose a faster shutter speed).

Shutter Priority Mode (S or TV)
Shutter priority is very similar to aperture priority mode but is the mode where you select a shutter speed and the camera then chooses all of the other settings. You would use this mode where you want to control over shutter speed (obviously). For example when photographing moving subjects (like sports) you might want to choose a fast shutter speed to freeze the motion. On the flip-side of this you might want to capture the movement as a blur of a subject like a waterfall and choose a slow shutter speed. You might also choose a slow shutter speed in lower light situations.

Program Mode (P)
Some digital cameras have this priority mode in addition to auto mode (in a few cameras Program mode IS full Auto mode… confusing isn’t it!). In those cameras that have both, Program mode is similar to Auto but gives you a little more control over some other features including flash, white balance, ISO etc. Check your digital camera’s manual for how the Program mode differs from Automatic in your particular model.

Fully Manual Mode
Manual Mode
In this mode you have full control over your camera and need to think about all settings including shutter speed, aperture, ISO, white balance, flash etc. It gives you the flexibility to set your shots up as you wish. Of course you also need to have some idea of what you’re doing in manual mode so most digital camera owners that I have anything to do with tend to stick to one of the priority modes.

How to control and get the shot you want!


This is great info for Beginners or someone who owns a point and shoot: This will help you get use to your camera:

Understanding and using these modes gives you a little more control over settings like Aperture and Shutter Speed as each of them will trigger different settings in your camera.

If you WANT more control over Aperture and Depth of Field. I’d encourage you to shoot in two modes – ‘Portrait’ and ‘Landscape’at first to get use to your camera's functions.

If you’re looking for Shallow Depth of Field (ie your foreground and background blurry) shoot in Portrait mode as this will trigger your camera to choose a wider aperture.
Look at this picture: Do you see how the camera is focused on my son and the background is blurry.

If you’re looking for a wider depth of field (ie everything in focus) shoot in Landscape mode where the camera selects small apertures in this mode. In this picture everything is visible and the background is not blurry.

If you’re looking for a fast shutter speed choose ‘Sports’ mode as in this mode it’s assuming you want to freeze fast moving subjects. In this picture the girl is going for a shot and her jump was caught in the mid-air.

If you’re looking for a slow shutter speed you’ll have more of a challenge as most cameras don’t have an automatic mode that naturally chooses this. You could try shooting in Night mode (if your camera has it) but this mode will also fire off a flash. Try covering your flash up and you might get the result you’re after.
Of course none of these modes allow you to get specific about the settings your camera chooses but they do give you a bit more control than you might think you have.
LOOK for other posts on the rest of the functions on your camera!

Choosing your Passion!

There comes a point in time when you will need to decide what type of photography you like and the specific genres you want to focus on. Most of us start out as generalists, shooting anything and everything that tickles our fancies. But there comes a time when you need to decide on what type of photographer you are or want to be. Pretty soon after my journey into SLR photography I decided what I liked and what I wanted to focus on. The world of Family, Children and Weddings was passion. So I gradually bought the equipment that would help me create better images to support my love. I began defining myself as a photographer.Mine of course at first was my son! I now enjoy shooting babies, families and weddings!

WHAT'S Your Passion?


Beginner Wedding Photographer!

If you choose to go on the path of being a wedding photographer and it is your first gig:


  • I would reccommend not doing it alone, hire someone who knows what they are doing and someone you can learn from.

  • Make sure to have backup equiptment, two camera body's, batteries, two or three flashes, and the right lenses.


When I shot my first wedding, i woke up the next morning with a sore body for some odd reason. I looked it up and asked other photographers, they insisted that I take Advil or Tylenol before I start shooting to prevent any boyd aches. I thought it was "Stupid" when I read it before, I wish I would have listened before hand. :) The pain was from all of the up, down, sideways, and fast pace movement of shooting a wedding.

I know ever since my second wedding I have not missed a dose. I keep them in my camera bag next to the batteries. (LOL)

Hope this is helpful!


Saturday, May 1, 2010

Blog contest for all!


Its time to announce Mamaratzy's first Global Blog contest! Each of Mamaratzy's 2010 contest will be geared to Mamaratzy's most loyal readers. Mamaratzy Photography enjoys everyone who is a supporter of her love, and what better way to express that than with a FREE GIFT to her fans.


1) Send in your favorite image and why it is your favorite image (in 150 words or less).


2) Deadline to submit your image is May14th 2010. I will post all of the submitted images and paragraphs by May 18th on the blog. Once they are on the BLOG, the fun will begin.


3) After they have reached the blog, you as a CONTESTANT will have the opportunity to get votes for your image. THIS IS WHERE ALL OF YOUR FRIENDS, FAMILY, NEIGHBORS come in. Voting will beginning the minute the images are posted and will close May 16th at 11:59pm.


PLEASE SEND IMAGES TO : www.mamaratzyphotography@gmail.com


What do you WIN?


After votes are counted and the winner is selected, you will RECEIVE either a:


- 2 GIG SD card


- or a 50inch Professional tripod including case and will work with any NIKON or CANON camera.


REMEMBER this contest is only for you BLOG lovers.


GOOD LUCK and get writing!