Sunday, November 13, 2011

Im Back everyone!


Sorry I have been away to all you regular viewers. I was just a bit occupid with my new little man.


He is such a blessing to add your our family. I am NOW the QUEEN BEE of the house. Noah was actually 3 weeks old during this shoot. It was easy to capture him with my 50MM lens and for those close ups I used my 85MM..


Malachi loves his new little brother. He is such a big help with him.


My family is alot of fun with 2 sweet little boys, it is challanging but I WOULD NOT have it any other way. Now my boys are 5 MONTHS (Noah) and 3 YEARS OLD (Malachi.

Wednesday, August 18, 2010

SWEET NEW BORNS.


Here was a great newborn shoot. Sweet Charlotte, she was 2 just 2 weeks old.


I have posted before and after shots of some of my editing work to show how , photographer's make things happen.


Monday, August 16, 2010

BACK TO SCHOOL SPECIAL


Back to school specials:
All packages include time and talent of photographer 30 minutes on-location of your choice and 15-20 edited images in an online gallery: (This is per child)
ALL PACKAGES BELOW:

Apples:

1-8x10
1 set of wallets
5 edited images with print release
$75.00


Bell:

1-8x10
1 set of wallets
10 edited images with print release
$125.00


Playground:

1 set of wallets
All edited images with print release
$215.00

Contact me at mamaratzyphotography@gmail.com
or Tiffanycbrown06@yahoo.com
I look forward in hearing from you!

Wednesday, May 26, 2010

BEST SHOTS when you are in control ( MANUAL MODE)


Taking your camera off "auto pilot" and doing some of the legwork can be a bit intimidating at first. Like I said before, a good digital photography book will explain all that you need to know if you're a little unsure of yourself. Or just simply experiment with your camera-it is digital-there's no film processing costs! Aperture, shutter, focus-these aren't nearly as hard to learn to adjust manually as it may seem, I promise! After all, I managed to teach myself these concepts, and have gone on to become a serious amateur photographer, even getting paid for some of my work!
The short answer, & especially in tough conditions, first set the f-stop & shutter speed you need. Then adjust the ISO.

Shooting in Manual. I mentioned that there may be 6 or more combinations of Aperture and Shutter Speed that give us a good exposure. In auto, the camera arbitrarily selects one of these combinations and that's what you get. This is why we want to shoot in manual. You know what you're trying to achieve when you depress the shutter, the camera does not. Ok. Ready. Turn that dial to M. Check your ISO. Change it if you need to. Bring the viewfinder up to your eye. Still looks the same right. Except for the meter. What is the meter telling you? Underexposed? Try a lower f/stop to let in more light or a slower speed to give the light more time to get in. This is where you start learning to shoot in manual. Remember that there are a few different combinations of settings that will turn out a good exposure. Try a few. See how different f/stops affect the photo. You may notice the meter change as you zoom in or out. Most consumer level lenses have a range for the largest aperture (small number) that changes with the focal length. You can look this up on your own. Just know that zooming in my change your exposure and require you to make an adjustment. Some cameras may have only one adjustment dial and require you to depress a button while turning that dial to adjust one of the settings. It will take a little time and you will forget some things at first. Stick with it. You will see a difference in your photos in the end.

Tuesday, May 25, 2010

MY baby is 20 months

My sweet little man is growing so fast, it is super hard to capture him. I was ready this time with my 85mm lens.

Sunday, May 23, 2010

Macro! What is MACRO Photography?


I have always wanted to try my hand at “Macro Photography” - Let me tell you, not only is it interesting, but it keeps you thinking and most of all it can become an addiction. The reason being that the more detail you get into it, you end up buying a lot of new equipment.

So what is this Macro Photography after all? To cut a long story short, it is a method of getting close up pictures of a subject. It helps you take close up pictures of small things.
Many say it is
“AN ART OF TAKING CLOSE UP PICTURES THAT REVEAL DETAILS WHICH CAN’T BE SEEN WITH NAKED EYE”
It is a term applied to most close up photos but should actually only be applied to photos which have a 1:1 or closer magnification.
Macro is a fascinating field in photography as you can take macro shots where ever you are. From finding small details of larger objects to creating abstract looking images; from taking pictures of creepy creatures like spiders and beetles (my favorite subject) to taking close ups of flowers, you can do it all.

I would like to share some of the inputs and knowledge that I have picked up through my experiments with Marco Photography. Here are few points I have put together, which might help you in getting up close with “Macro Photography Tips and Techniques”
*** If you do not have a MACRO lens, I have a converter macro attachment to test the waters out.
1) Switch on Macro Mode:
This could be simple, but again could be a little confusing for the average beginner. This setting allows you to bring the camera lens closer the subject. Generally it is represented by a small flower on the settings dial of the camera; it could depend on the lens as well.
3) Use Flash:
I would NOT recommend using flash. However it is essential as shadows are a macro photographer’s enemy. Choose a location where there is bright light available and don’t forget to carry some form of a reflector to fill the shadow. It could be a proper reflector from a photo shop or a white back cover.It would be an advantage if your camera gave you control over the flash, if it doesn’t use a piece of tracing paper and drape it over the flash to diffuse the strong flash light.

4) Manual Focusing:
I would recommend setting the focus to manual and focus on the part of the subject you want in sharp focus. The ability to focus manually is a big bonus, however allowing the camera to choose by auto focusing will interfere with where you want to focus.

5) Aperture:
Ability to set aperture is a big advantage as this allows you to control the depth of focus mentioned in point four. It determines how much of your image is in focus in front of the subject. I believe some cameras won’t allow changing the aperture once the setting has been changed to macro mode. If you can change the aperture you’ll probably use a large aperture in order to blur out the background which is very effective for close ups.
6) Composition:
I feel this is one area where you’ve got to pay a lot of attention. Placing your subject and making it the focal point are essential to good macro photos. Do not be so focused on the detail you could end up with a situation where the composition goes out of the window.

7) Self Timer:
Yes! You heard me right; a self timer plays an important role in limiting camera shake and vibration when pressing the shutter button.

Thursday, May 20, 2010

ISO vs. APETURE

I am getting alot of request to post more information about ISO and Apeture:

ISO determines how sensitive your sensor is to the light. The higher the ISO value, the more light your camera can record. The downside is that the higher the ISO value the more noise you will see in the image. Noise is the grainy, gritty like effect you will sometimes see in your images. I always try to shoot at the lowest ISO value that I can.
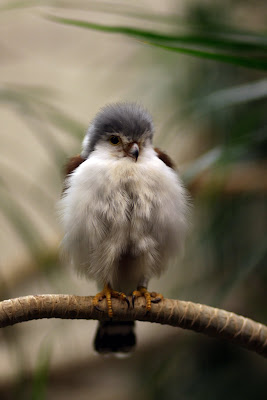
(This picture was shot with an 85mm at f/1.8) You can see how ALL of the focus is on the bird and the background is completely blurried out.


Your apeture setting is what can create a soft, blurry, out of focus background. The apeture is the opening inside your lens that lets the light pass through it an onto the sensor. The effect is called Depth of Field (DOF). This is the area in front of, and behind your focal point that is acceptably sharp. The bigger the opening - such as f/1.8, the shallower the depth of field. With a shallow depth of field you will get that blurry background. Great for portraits, and shots that you really want to isolate one subject and make it stand out. The smaller the opening - such as f/16, the deeper the DOF, meaning much more of the stuff in the image will be in focus. This is ideal for lanscape shots, when you want to be able to see everything nice and sharp.

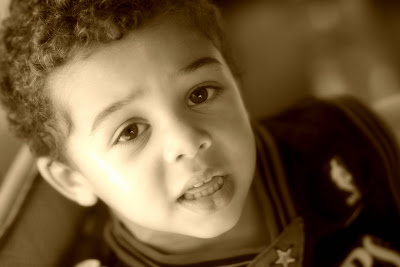
(This picture was taken with an 85mm at f/2.20) You see the background is slightly blurry and all the focus is on handsome LJ.

Bryan Peterson has a book called Understaning Exposure This book does an amazing job explaining this.